Kathy Berryhill
Creek County Master Gardener
When thinking about the word frugal, most thoughts are centered around fiscal frugalness. Although spreading our gardening dollars further is key, spending gardening hours wisely is equally beneficial. During the spring season, many gardeners struggle to keep up with the overwhelming task of preparing and planting gardens and flowerpots. Providing adequate moisture to new plants is vital, but sometimes this task can be delayed while meeting the many other demands in our yard.
As the summer heat arrives, our plants will be more established, but the watering demands will increase. Busy schedules, vacations, and limited time in the yard can lead to disastrous results for thirsty plants. Dragging a hose around to gardens and pots is time consuming and expensive and often leads to inconsistent water availability. Installing a commercial sprinkler system could solve this problem, but may be cost prohibitive.
To inexpensively and effectively solve your watering needs, consider a DIY solution. A self-installed drip irrigation system (micro irrigation) provides water via a system of above ground supply lines with emitters placed strategically. By delivering water to the root zone slowly and precisely, water use is reduced dramatically, consistently and without evaporation. Also, the flow rate is and frequency is adjustable and can be set to suit different plants. The concept is somewhat simple and mostly repetitive. Drip irrigation parts can be purchased online, at hardware or big box stores. The micro irrigation parts are usually found in the plumbing department, near the larger irrigation systems. Purchasing individual parts allows for more customization, but complete drip irrigation kits are also available. The overall cost of parts is fairly inexpensive and your efforts will end up saving you time and water while producing healthier plants!

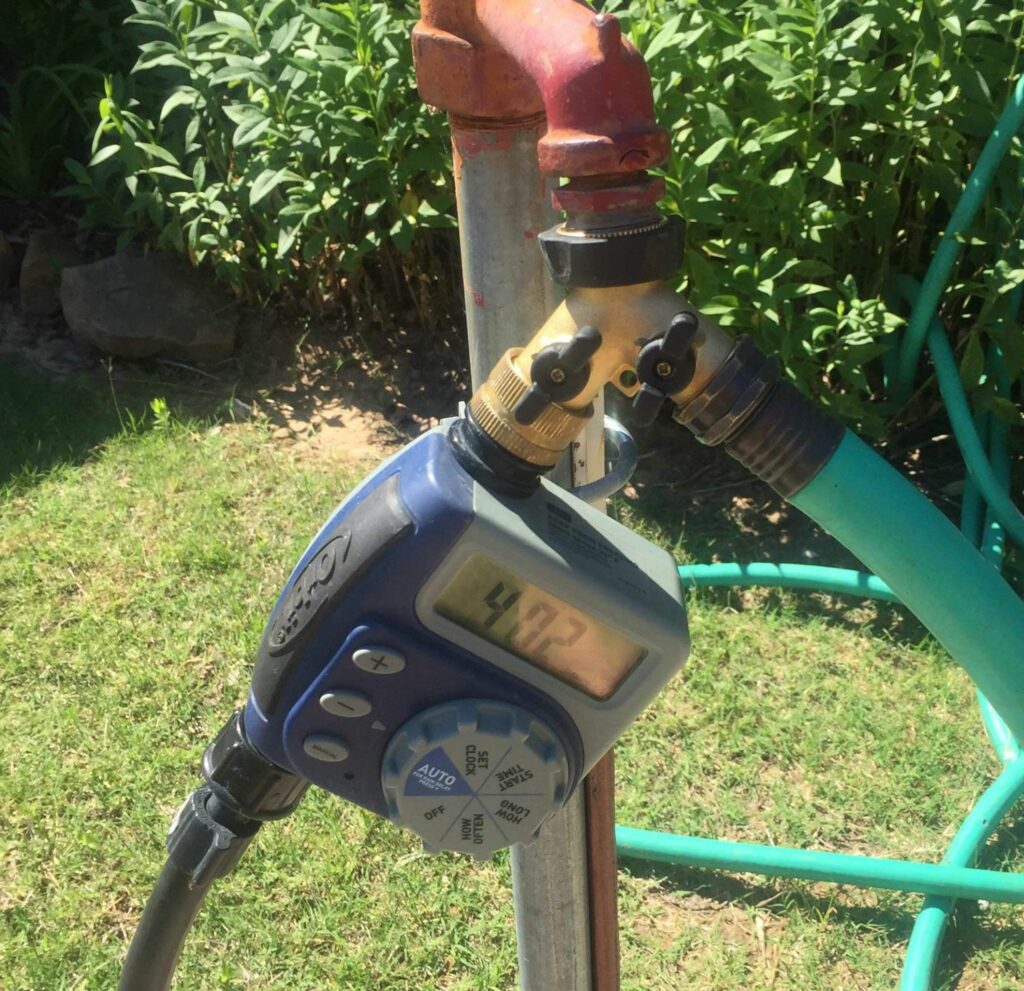
To install a drip irrigation system, attach a hose watering timer with a “Y” splitter to the faucet. The remaining side of the Y splitter allows access to the faucet while the drip irrigation is still in place. For the timer to supply water, the faucet must be left on but on/off controls on the Y splitter allows one side to be on, and one side to be off. If needed, a water pressure regulator and/or a backflow preventer can be installed at this time.
A roll of ½” supply tubing attaches to the timer with a faucet adapter. Attach an end cap at the end of this tubing. Next place the ½” tubing throughout your garden near where you want to deliver water. A smaller ¼” feeder tubing attaches to the ½” tubing by using a punch tool to insert a ¼” connector. Attach your choice of an emitter at the end of the smaller tubing, and place it near the plant or in a pot. Finish the project by setting the timer for desired time of day and length of time to run.
Once installed and operating, the drip irrigation system runs according to the timer settings and provides relief from the task of watering! However, some ongoing maintenance is needed. Make sure the faucet and splitter do not leak. Watch for an occasional emitter cap to blow off. This event will make a fountain that can’t be missed. Occasionally, a ¼” feeder line will blow off. As the fittings will have stretched out the end of the feeder tube, cut off the stretched end before reapplying. Remember the timer is battery operated so sometimes new batteries are needed.
Helpful hints? Purchase and install a RV water filter to remove chemicals in the city water. Attach the filter to the timer before connecting to the ½” supply line. Buy black or dark brown tubing as it will blend into your landscape better. Run the smaller feeder tubing up inside the drip hole of a pot to help camouflage the tube. If you need to cross a sidewalk to access a part of your garden, hide ¼” tubing in a sidewalk crack. Placing the emitters at the base of a plant helps prevent disease by minimizing water contact with the leaves, stems, and fruit of plants.
Need more information? A detailed DIY guide for installation can be provided by emailing gardener@sapulpatimes.com
Remember to mark your calendar for the 2022 Creek County Master Gardener Plant Sale. The sale will be held Saturday, April 30th at the Sapulpa Farmers’ Market, located in the Creek County Courthouse parking lot. Hours are 7:30 AM – 11AM. MGs will have quality plants grown from seeds or transplanted from their own yards available at great prices. This is also a good time to talk to a Master Gardener about your gardening questions.
Happy Gardening!


